How can you improve your wine-tasting experience? By using the four steps of wine tasting.

Why Do You Need to Take Four Steps?
Our fast-paced world means that we very often eat and drink on the run. When we’re doing this, do we experience much of what we’re tasting? Probably not.
To get the most out of a wine tasting, you really want to take your time and delve in. You want to involve all your senses. What are you seeing? What are you smelling? What are you tasting? Even what are you hearing? Toasting glasses is a big part of a wine tasting.
Having four steps of wine tasting is a great reminder to slow down and luxuriate over each glass of wine.
What Are the Four Steps of Wine Tasting?
We’ll go into each step in more detail below. For now, here is a summary of the four steps:
1. See. Hold your glass to the light or against a white tablecloth, and observe the color and the clarity.
2. Swirl. The wine has been trapped in a bottle for a period of time. You need to help it open up. When you swirl, you aerate the wine and bring the aromas to the surface of the glass.
3. Smell. Think of yourself as a hound dog. You’ll want to take many sniffs.
4. Sip. Put a fairly large amount of wine in your mouth and coat your entire mouth before swallowing.
Seeing the Wine
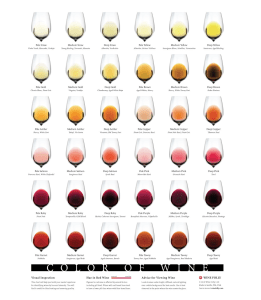
The color of the wine tells you a lot about the wine.
Let’s start with whites. If a white is very yellow, it could mean that the grapes were exposed to oak in the wine making. Oak makes wines more yellow. It could also mean that the wine is somewhat old. White wines get darker as they age. In fact, a very old white wine can have many brown hues. But a semi-old white wine can look pretty yellow.
Wines with a green tint are likely to be very young, having spent little time in the bottle. Uptown Spirits says that “As wines age, they lose their chlorophyll molecules and take on a browner color. Green wines can come from any grape variety, but they’re most commonly made with Sauvignon Blanc or Semillon.”
Wine Folly explains that the color and depth of color are a product of the grape used, its ripeness at harvest, the specific wine-making method (oak vs. no oak, cold soaking, extended maceration, etc.) and any post-fermentation aging or maturation in the barrel or bottle.
Now for reds. Uptown Spirits provides some good insight here: 1) Most red wine is made with dark-colored grapes, and the skins of these grapes contain a pigment called anthocyanin. Anthocyanin is what gives red wine its distinctive color. 2) The longer the grape skins are in contact with the juice, the darker the color of the wine will be. 3) Lighter-bodied reds such as Pinot Noirs will be paler in color, while heavier reds such as Cabernets will be darker. 4) If the oak barrel is young, the wines take on a reddish hue. If the oak barrels are older, the wine takes on browner notes.
Wine Folly has an amazing color chart that I’ve copied here.
Swirling the Wine
When you swirl a glass of wine, you release hundreds of unique aroma compounds, which attach themselves to the oxygen in the air. This helps separate the aromas in the wine, enriching the smelling and tasting experience.
Why would the smell enrich the tasting experience? Because most of your tasting experience comes from what you’re smelling. A good reason to not taste wine when you have a cold.
Tour de Vine by Heli explains that the way a wine responds to swirling gives you an idea of its texture and viscosity. Wines that are high in alcohol content or dense and rich with tannins or sugar will swirl more slowly in the glass and stick to the sides. Because of their viscosity, these wines produce more wine legs or wine tears, so you’ll see small streams or droplets left on the sides of your glass after you’ve swirled.
If you’re new to swirling, place your glass on a flat surface, hold the glass stem, and use the stem to rapidly draw circles with your glass on the flat surface.
A fun thing to do is to take two identical glasses, swirl one furiously for a minute, and then do a taste comparison. You’re likely to find the swirled one tastes much better.
Smell
When we talk about “nose” or “aroma” in the wine world, we are referring to the smell of the wine. Smelling the wine before tasting is important, since smell affects how we process flavor in our brain.
It’s helpful to think in categories. For example, with white wine, are you smelling citrus? Tropical fruits? Flowers? If you’re smelling citrus, is it orange? Lemon? Grapefruit? Lime?
With red wine, are you smelling berries? Which kinds? Are you smelling chocolate? Are you smelling nuts? Something else?
It’s helpful to use an aroma wheel when smelling wine. The wheel has so many aromas that you would never think of: banana, cardboard, tobacco, etc.
Sip
Now for the best part. We get to sip the wine. Woo hoo! You’ll start by seeing if what you smelled coincides with what you are tasting. Often times, this is the case. But sometimes it’s not. Beyond what you smelled, you’ll observe things like:
- The wine’s acidity – does your mouth pucker as you drink this wine?
- The wine’s sweetness
- The wine’s heaviness in your mouth – heaviness tends to be associated with higher alcohol
- The wine’s texture – is it silky? oily? rough?
- The wine’s length – can you find a beginning, middle and end to the taste?
- The wine’s finish – what do you experience after the wine has gone down your mouth?
Do you need to take the four steps of wine tasting every time you drink wine? I think it’s valuable to do on your first sip or two of a new wine. And it’s a great way to compare notes with your fellow tasters.
Cheers!


